
Why This Beer Can Chicken on Pellet Grill Recipe Is a Game Changer
Let me tell you about the time I first tried making beer can chicken on pellet grill for my family’s Sunday barbecue. It was one of those lazy afternoons where everyone wanted something flavorful but easy to prepare. I had heard so much about this method—how juicy and tender the chicken turns out—but honestly, I wasn’t sure if it was all hype. Boy, was I wrong! The aroma that wafted through the backyard was enough to make everyone drool before we even sat down to eat. If you haven’t tried beer can chicken on pellet grill yet, trust me, your taste buds are in for a treat.
A Little History Behind Beer Can Chicken
Beer can chicken isn’t exactly new—it’s been around since grilling became popular in American backyards decades ago. Originally, people would balance a whole chicken on an open beer can over hot coals. The idea? Let the steam from the beer infuse moisture into the chicken while it cooks. These days, modern tools like pellet grills have taken this classic technique to another level. Whether you’re using a Traeger, Camp Chef, or Pit Boss pellet grill, this recipe brings tradition and technology together beautifully. My favorite version? Beer can chicken on Camp Chef pellet grill—it gives the bird a perfect smoky flavor every single time.
Why You’ll Love This Recipe
This beer can chicken on pellet grill recipe is as close to foolproof as it gets. The chicken stays incredibly moist thanks to the beer steaming inside, while the skin gets crispy and golden brown. Plus, it’s ridiculously simple to prep. Just season, pop it on the grill, and let the magic happen. And don’t worry if you’re not a pitmaster—you won’t need any fancy skills here. Whether you’re cooking for two or feeding a crowd, this dish will impress without breaking a sweat.
Perfect Occasions to Make Beer Can Chicken
If you’re looking for a show-stopping centerpiece for your next gathering, look no further. Beer can chicken on pellet grill is perfect for summer barbecues, football tailgates, or even casual weeknight dinners. Imagine serving this at your next backyard party—the sight of that chicken perched proudly on its beer can throne is sure to spark conversation (and maybe a few laughs). Plus, leftovers make killer sandwiches the next day!
Ingredients
- 1 whole chicken (about 4-5 pounds)
- 1 can of beer (your choice—I love using lager or ale)
- 2 tablespoons olive oil
- 1 tablespoon garlic powder
- 1 tablespoon onion powder
- 1 tablespoon paprika
- 1 teaspoon salt
- 1 teaspoon black pepper
- Optional: fresh herbs like rosemary or thyme for extra flavor
Substitution Options
Not a fan of beer? No problem! You can swap it out with apple juice, chicken broth, or even sparkling water for a booze-free option. As for seasoning, feel free to experiment with your favorite spice blends. A Cajun rub works wonders if you want some heat, or try Italian herbs for something more Mediterranean-inspired. Want to go low-carb? Skip the breading altogether and focus on bold spices instead.
Preparation Steps
Step 1: Prep Your Chicken
Start by patting the chicken dry with paper towels. This step is crucial because dry skin equals crispy skin later on. Once it’s dry, brush it lightly with olive oil to help the seasoning stick. In a small bowl, mix together garlic powder, onion powder, paprika, salt, and pepper. Rub this blend all over the chicken, making sure to get into every nook and cranny. Pro tip: Let the chicken sit with the seasoning for 15 minutes to let the flavors sink in.
Step 2: Set Up Your Pellet Grill
Preheat your pellet grill to 350°F. If you’re wondering, “What temperature do I grill beer can chicken?”—this is the sweet spot. It ensures the chicken cooks evenly without drying out. For those asking, “How long does it take to smoke a chicken on a pellet grill at 225 degrees?”—you’d need closer to 3 hours, but I prefer 350°F for juicier results. Add wood pellets of your choice; I recommend hickory or cherry for a rich, smoky flavor.
Step 3: Mount the Chicken on the Beer Can
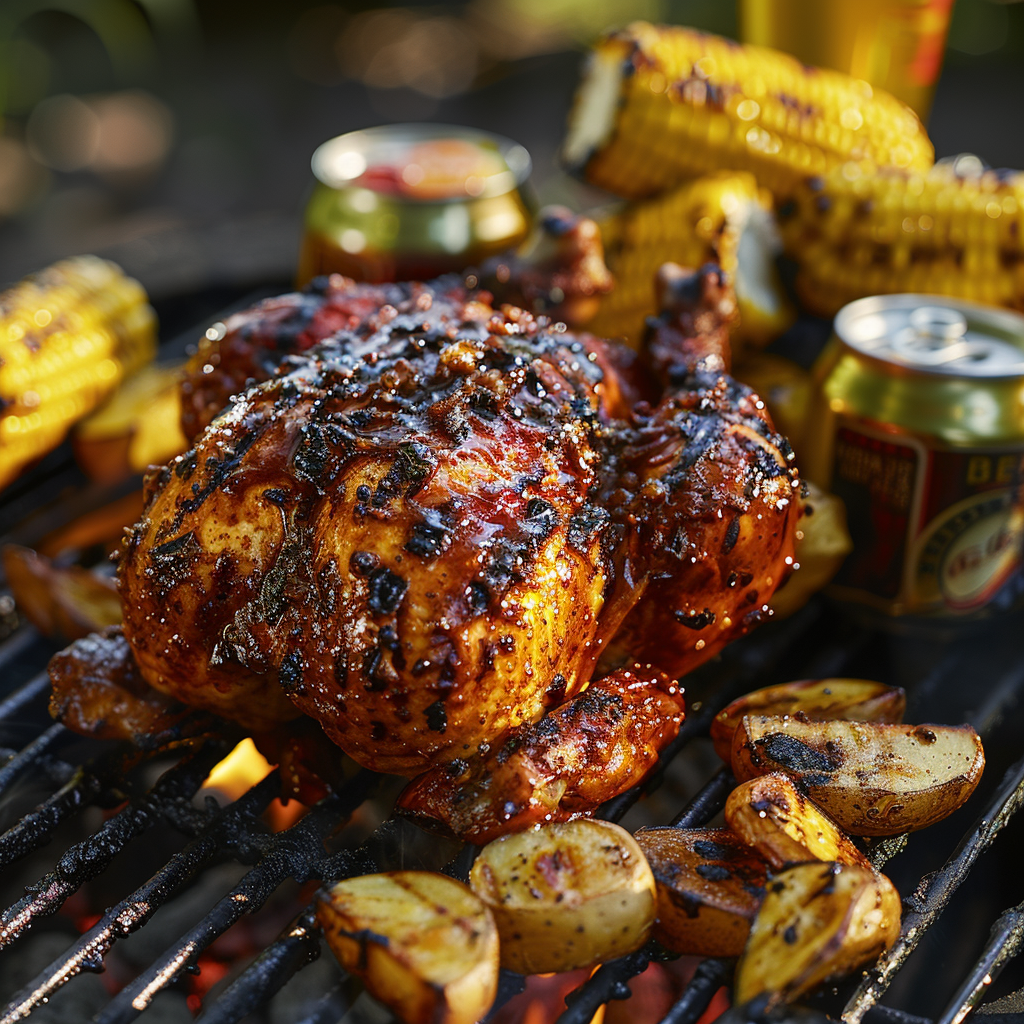
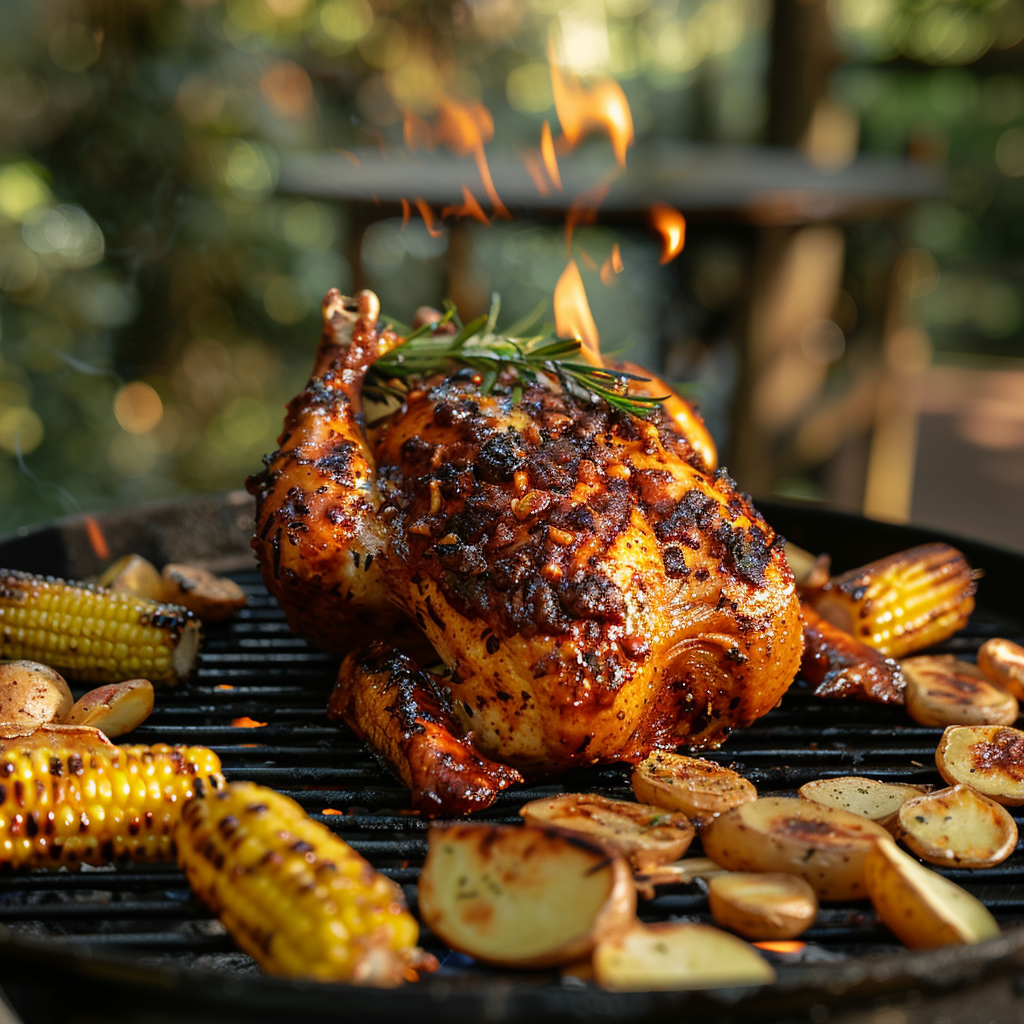
Open your beer can and pour out—or drink!—about half of it. Place the chicken cavity over the can so it looks like it’s sitting on a throne. This setup keeps the chicken upright and allows the steam to circulate inside. Some folks use a special beer can chicken throne accessory, which stabilizes the bird during cooking. If you’re using a Pit Boss smoker beer can chicken setup, this tool comes in handy.
Step 4: Cook the Chicken
Place the chicken on the grill, ensuring it’s stable. Close the lid and let it cook for about 1 hour and 15 minutes. To answer the question, “How long to smoke a beer can chicken at 250 degrees?”—it takes roughly 2.5 hours, but at 350°F, it’s faster. Use a meat thermometer to check for doneness; the internal temperature should reach 165°F in the thickest part of the breast. Chef’s tip: Baste the chicken with melted butter halfway through for extra crispiness.
Timing
Here’s a quick breakdown of timing:
- Prep Time: 15 minutes
- Cooking Time: 1 hour 15 minutes
- Resting Time: 10 minutes
- Total Time: About 1 hour 40 minutes
Chef’s Secret
For an extra layer of flavor, add a handful of fresh herbs like rosemary or thyme to the beer can before inserting it into the chicken. The steam carries these aromatics right into the meat, giving it a gourmet twist.
Extra Info
Did you know that beer can chicken has become such a cult favorite that there are now specialized racks called beer can chicken thrones? These gadgets hold the chicken steady and prevent accidental tipping—a lifesaver if you’ve ever had a wobbly bird on your hands!
Necessary Equipment
- Pellet grill (Traeger, Camp Chef, Rec Tec, Pit Boss, etc.)
- Meat thermometer
- Beer can or alternative liquid container
- Optional: beer can chicken throne for stability
Storage Tips
Leftover beer can chicken stores well in the fridge for up to 3 days. Wrap it tightly in plastic wrap or place it in an airtight container to keep it fresh. Reheat gently in the oven to avoid drying out the meat. If you’re planning ahead, you can freeze portions for up to 3 months. Just thaw them overnight in the fridge before reheating.
For meal prep enthusiasts, shredded leftover chicken makes a fantastic base for salads, tacos, or soups. Simply pull the meat off the bones and store it separately for quick weekday meals.
One last storage hack: Save the carcass to make homemade chicken stock. Simmer it with veggies and herbs for a flavorful broth that beats anything store-bought.
Tips and Advice
- Use a drip pan under the chicken to catch drippings and prevent flare-ups.
- Don’t overcrowd the grill—give the chicken plenty of space for airflow.
- Experiment with different beers to find your favorite flavor pairing.
Presentation Tips
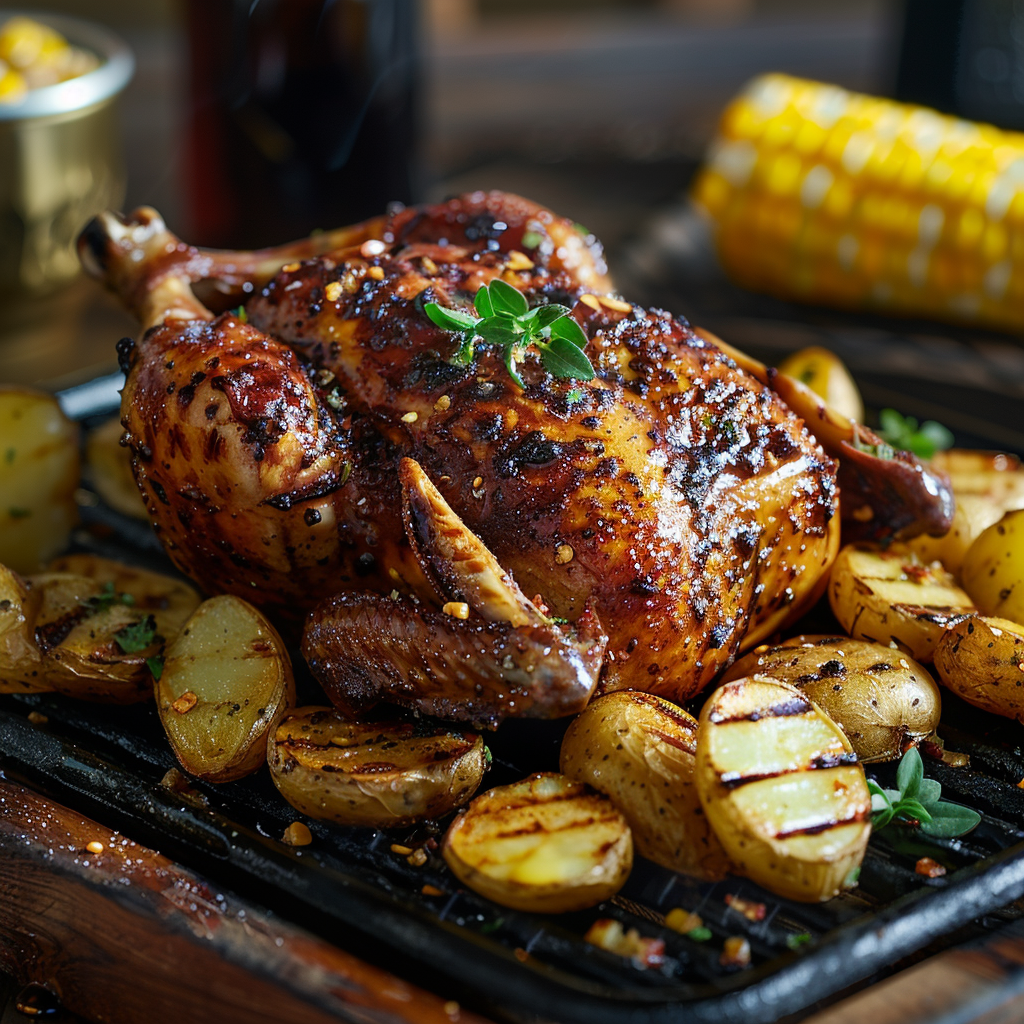
Serve your beer can chicken whole on a large platter surrounded by seasonal veggies or corn on the cob for a rustic look. Garnish with fresh herbs for a pop of color. Alternatively, carve the chicken tableside for a touch of drama. Pair it with sides like coleslaw, baked beans, or grilled potatoes for a complete feast.
Healthier Alternatives
Looking to lighten things up? Here are six variations:
- Boneless Skinless Chicken Breasts: Skip the whole bird and use boneless breasts marinated in citrus juice and spices.
- Turkey Version: Try turkey legs or thighs for a leaner option.
- Veggie Swap: Roast stuffed portobello mushrooms instead.
- Gluten-Free Option: Use gluten-free beer and seasonings.
- Low-Sodium: Reduce salt and use herb-infused oils for flavor.
- Keto-Friendly: Stick to high-fat seasonings and skip sugary marinades.
Common Mistakes to Avoid
Mistake 1: Overcooking the Chicken
Overcooked chicken is dry chicken, plain and simple. Always use a meat thermometer to ensure the internal temp hits 165°F. Going beyond that risks ruining the texture. Pro tip: Pull the chicken off the grill when it reaches 160°F, as it will continue to cook slightly while resting.
Mistake 2: Skipping the Drying Step
Skipping the step of drying the chicken skin means soggy skin. Take the time to pat it dry—it’s worth the effort for that crispy finish.
Mistake 3: Using Too Much Liquid
Filling the beer can too full can lead to spills and uneven cooking. Pour out about half the liquid to avoid accidents and ensure proper steam circulation.
FAQ
How long does it take to do a beer can chicken on a pellet grill?
At 350°F, it typically takes about 1 hour and 15 minutes. Lower temps like 225°F extend the cooking time to around 3 hours.
What temperature do I grill beer can chicken?
Aim for 350°F for balanced results. Higher temps speed up cooking but may dry out the meat if you’re not careful.
Can I use other liquids besides beer?
Absolutely! Apple juice, broth, or even water work great. Experiment to find what you like best.
Do I need a special rack for stability?
While not mandatory, a beer can chicken throne helps stabilize the bird and prevents tipping.
How long to cook beer can chicken on pellet grill at 250°F?
About 2.5 to 3 hours, depending on the size of the chicken.
Is beer can chicken safe to eat?
Yes, as long as the chicken reaches an internal temperature of 165°F.
Can I use a Pit Boss pellet grill for this recipe?
Definitely! Pit Boss smokers are excellent for beer can chicken.
Should I brine the chicken beforehand?
Brining adds moisture but isn’t necessary if you’re already using the beer can method.
Can I add wood chips for extra smoke?
Yes, adding wood chips enhances the smoky flavor. Hickory or mesquite pairs well with chicken.
What sides pair well with beer can chicken?
Grilled veggies, potato salad, and cornbread are classic choices that complement the dish beautifully.
Final Thoughts
Beer can chicken on pellet grill is one of those recipes that feels like a celebration every time you make it. With minimal effort, you get maximum flavor—and who doesn’t love that? So grab your grill, a cold can of beer, and invite some friends over. Trust me, once you try this method, it’ll become a staple in your repertoire. Happy grilling!
src=”https://chickenrecipes.ozviral.com/wp-content/uploads/2025/10/beer-can-chicken-on-pellet-grill4-file-1.png” alt=”beer can chicken on pellet grill”>
Beer Can Chicken on Pellet Grill
Ingredients
Equipment
Method
- Pat the chicken dry with paper towels and lightly brush with olive oil.
- In a small bowl, mix garlic powder, onion powder, paprika, salt, and pepper. Rub this blend all over the chicken.
- Let the chicken sit with the seasoning for 15 minutes.
- Preheat your pellet grill to 350°F and add wood pellets of your choice.
- Open your beer can and pour out about half of it.
- Place the chicken cavity over the beer can and ensure it's stable.
- Place the chicken on the grill and close the lid.
- Cook for about 1 hour and 15 minutes, checking for doneness.
- Use a meat thermometer to ensure an internal temperature of 165°F in the thickest part of the breast.
- Baste the chicken with melted butter halfway through cooking, if desired.
- Let the chicken rest for 10 minutes before serving.